keycloak18使用3 Linux平台部署keycloak
Linux平台部署keycloak
- 下载安装
- 1 访问: https://www.keycloak.org/downloads

- 2 ftp或者scp上传服务器
- 3 解压目录 tar –xvf keycloak-18.0.0.tar.gz
- 4 改变所有者
chown -R deployer keycloak-18.0.0
chmod -R 755 keycloak-18.0.0
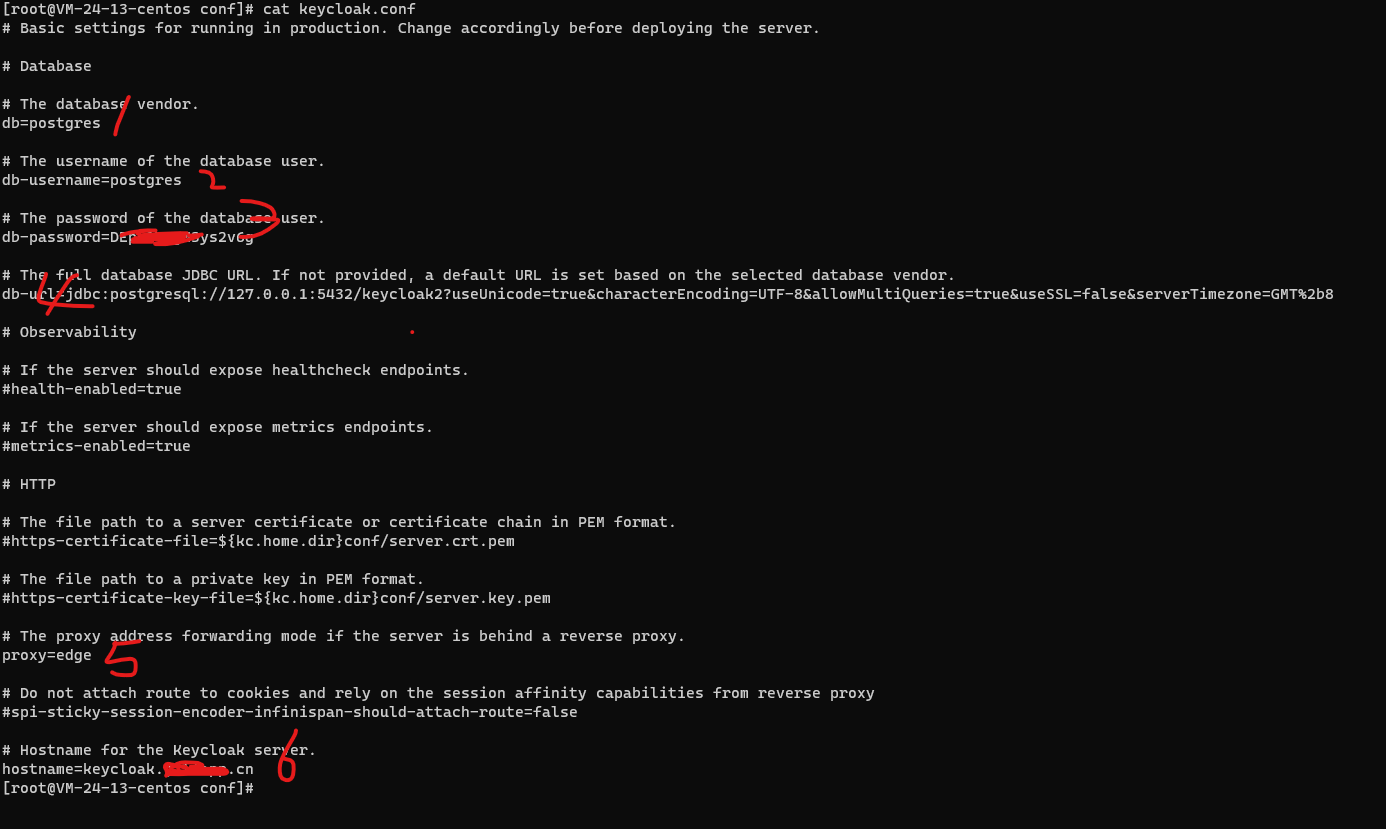
- 5 配置conf/keycloak.conf

保存好,build更新配置
sh ./bin/kc.sh build
注意
1-6步骤都需要配置
hostname为外网访问域名
proxy=edge为透明代理模式
db-url需要先建立好数据库,启动会自动初始化表结构
- Linux平台启动服务
第一次启动需要设置环境变量
1
2
3
| export KEYCLOAK_ADMIN=admin
export KEYCLOAK_ADMIN_PASSWORD=admin7x9r3
export PROXY_ADDRESS_FORWARDING=true
|
注意: 账号密码改成自己的,启动成功后还可以去页面改密码.
linux平台启动命令
- Nginx代理配置
Ssl配置
ssl.header
1
2
3
4
5
6
7
8
9
10
| listen 80;
listen 443 ssl;
ssl_certificate /usr/local/openresty/nginx/conf/ssl/fullchain.cer;
ssl_certificate_key /usr/local/openresty/nginx/conf/ssl/*.jiliapp.cn.key;
ssl_ciphers ECDHE-RSA-AES128-GCM-SHA256:ECDHE:ECDH:AES:HIGH:!NULL:!aNULL:!MD5:!ADH:!RC4;
ssl_session_cache shared:SSL:1m;
ssl_session_timeout 5m;
ssl_protocols TLSv1 TLSv1.1 TLSv1.2;
ssl_prefer_server_ciphers on;
|
keycloak.conf配置
1
2
3
4
5
6
7
8
9
10
11
12
13
14
15
16
17
18
19
20
| server {
server_name keycloak.xxx.cn; // // 上面配置的hostname
include /usr/local/openresty/nginx/conf/conf.d/ssl.header;
location / {
#增加以下配置-----------
proxy_buffer_size 1024k;
proxy_buffers 16 1024k;
proxy_busy_buffers_size 2048k;
proxy_temp_file_write_size 2048k;
#---------------------
proxy_set_header Host $host;
proxy_set_header X-Real-IP $remote_addr;
proxy_set_header REMOTE-HOST $remote_addr;
proxy_set_header X-Forwarded-For $proxy_add_x_forwarded_for;
proxy_set_header X-Forwarded-Proto $scheme;
proxy_pass http://localhost:8080;
proxy_redirect off;
}
}
|
重载nginx配置 nignx –s reload
访问系统页面
https://keycloak.xxx.cn/admin/master/console/#/realms/master
- 修改master密码
点击右上角用户图标/管理账户/ Account security/signing in/update
输入新密码即可
- 守护进程启动keycloak
1
| nohup sh ./bin/kc.sh start > nohup.out 2>&1 &
|
keyclock — Oct 11, 2022

